TensorFlow 自 2.11 版起,不再支援原生 Windows 利用 GPU 加速訓練。若是你想要在 Windows 上利用GPU 加速 TensorFlow 2.11 以上的版本,有以下幾種方式可以參考:
- 在 WSL 中安裝 CUDA Toolkit 與 cuDNN
- TensorFlow Runtime Docker Images
- DirectML Plugin for TensorFlow 2
本篇文章將介紹直接於 WSL 中安裝 TensorFlow 與 CUDA Toolkit 與 cuDNN 的方式。若你對 DirectML 有興趣,或是不想使用 WSL,可以參考 Microsoft 的文章
Windows Subsystem for Linux,自 Windows 10 版本 2004 起內建於 Windows 中,若是你的版本過舊,請參考 舊版 WSL 的手動安裝步驟
現在開啟你最順手的終端機(cmd、powershell 等),輸入以下指令確認你的 wsl 是否可用:
wsl --version若看到如以下輸出,則代表 WSL 可用,請繼續下去。
WSL 版本: 1.2.5.0核心版本: 5.15.90.1WSLg 版本: 1.0.51MSRDC 版本: 1.2.3770Direct3D 版本: 1.608.2-61064218DXCore 版本: 10.0.25131.1002-220531-1700.rs-onecore-base2-hypWindows 版本: 10.0.22621.2428若想知道有那些可安裝的發行版,可以輸入以下指令:
wsl --list --online這邊以 Ubuntu 22.04 為例,安裝 WSL:
wsl --install Ubuntu-22.04輸入後,請照著指示分別設定 username 與 password。設定完畢後,就會直接在 wsl 中了。如果要離開,可以輸入:
logout進入:
wsl -d Ubuntu-22.04
在全部開始之前,我們先進入家目錄:
cd ~WSL Ubuntu-22.04 預設已經安裝 python 3.10,直接輸入 python3 即可開啟。若有需求,也可以安裝其他版本,由於不是本篇重點,這邊就不做說明。之後輸入以下指令安裝 pip:
sudo apt update -ysudo apt install python3-pip -y安裝完 pip 之後,就可以安裝 TensorFlow 了:
pip install tensorflow之後,輸入以下指令查看 TensorFlow 是否可以讀到 CUDA:
python3 -c "import tensorflow as tf; print(tf.config.list_physical_devices('GPU'))"若是最後你得到了 [],先不用擔心,因為我們還有一些事情要做。
另外,TensorFlow 會報一些警告,你可以:
export TF_CPP_MIN_LOG_LEVEL=2 # 只輸出錯誤export TF_CPP_MIN_LOG_LEVEL=3 # 錯誤、警告、訊息都不輸出或是在 python 中可以:
import osos.environ['TF_CPP_MIN_LOG_LEVEL'] = '3' # 只輸出錯誤os.environ['TF_CPP_MIN_LOG_LEVEL'] = '3' # 錯誤、警告、訊息都不輸出請務必將此段程式放在 import tensorflow 前。
在 2.14、2.15 版本中,你會在 import tensorflow 時跳出錯誤訊息:
Terminal window 這個問題是由於在 TensorFlow 原始碼中重複引用 library 導致的警告,並不會影響正常執行,詳情可以參考 這篇
hello 。截至 2023/11/15
先輸入指令查看 CUDA 版本:
nvidia-smi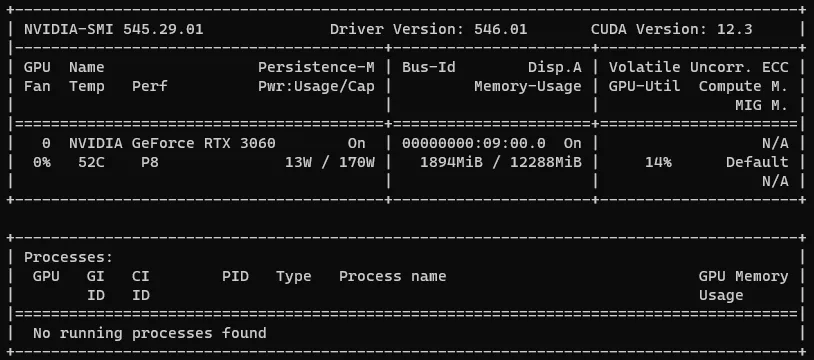
看到右上角的 CUDA Version,我的顯示 12.3,因此稍後我們所需要選擇版本時,都要圍繞著 12.3 (你的版本) 來挑選。
確認好 CUDA 版本後,到 CUDA Toolkit Archive
進入版本的頁面後,依照 Linux > x86_64 > WSL-Ubuntu > 2.0 的路徑,選擇喜好選擇安裝的方式,這裡幫你們把 deb (local) 的按出來:
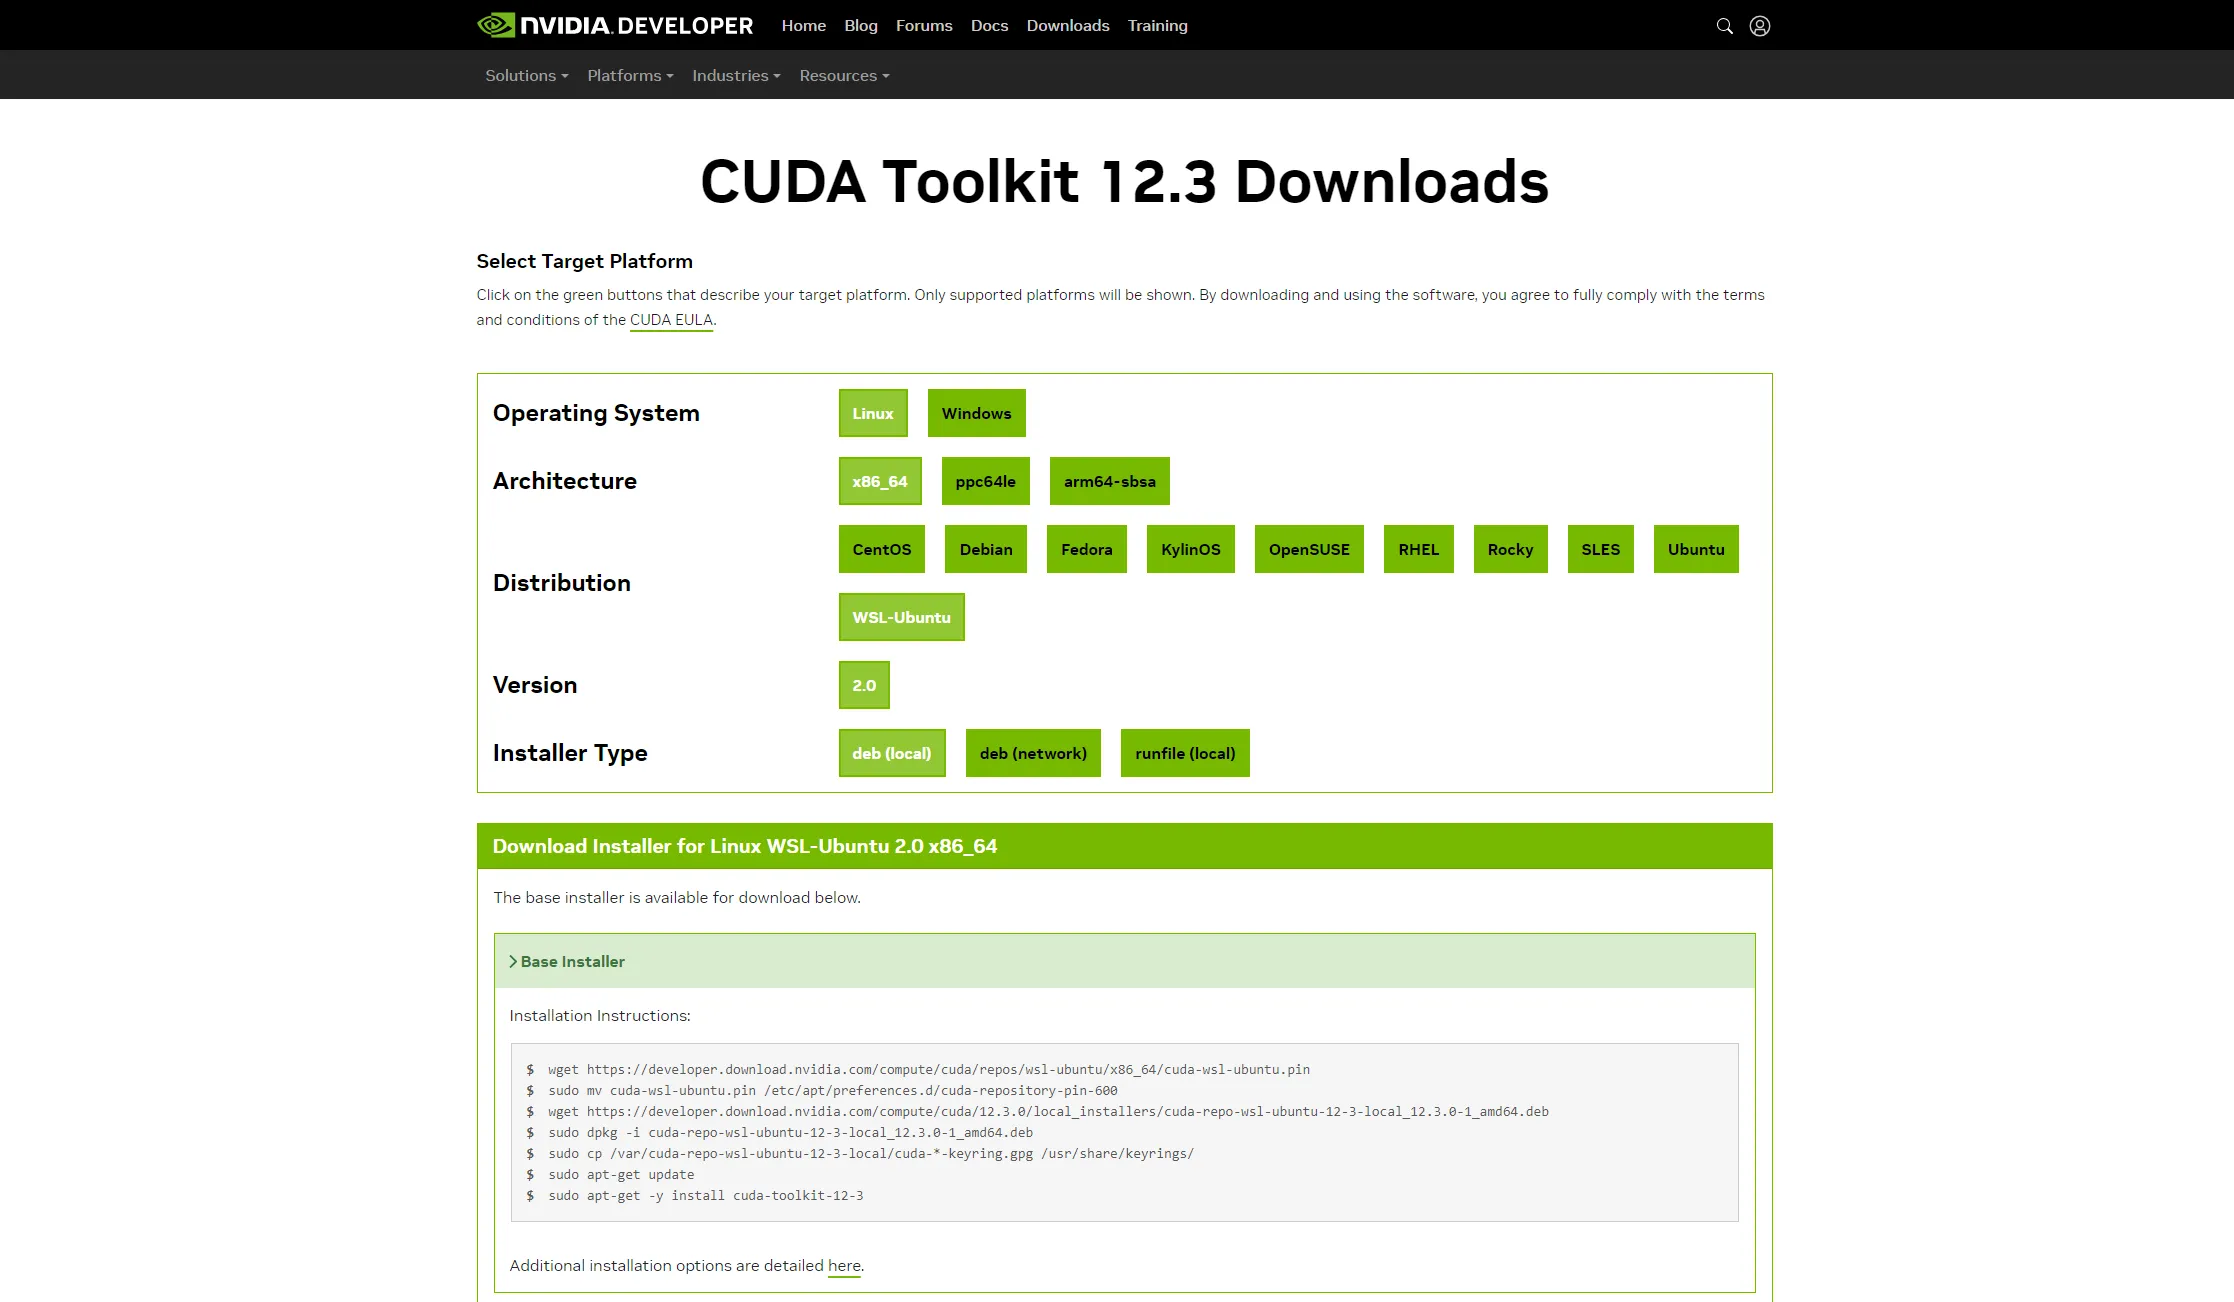
wget https://developer.download.nvidia.com/compute/cuda/repos/wsl-ubuntu/x86_64/cuda-wsl-ubuntu.pinsudo mv cuda-wsl-ubuntu.pin /etc/apt/preferences.d/cuda-repository-pin-600wget https://developer.download.nvidia.com/compute/cuda/12.3.0/local_installers/cuda-repo-wsl-ubuntu-12-3-local_12.3.0-1_amd64.debsudo dpkg -i cuda-repo-wsl-ubuntu-12-3-local_12.3.0-1_amd64.debsudo cp /var/cuda-repo-wsl-ubuntu-12-3-local/cuda-*-keyring.gpg /usr/share/keyrings/sudo apt-get updatesudo apt-get -y install cuda-toolkit-12-3根據網頁上跳出來的安裝指令,貼進 WSL 中執行。
執行完畢後,還要再裝 cuDNN
由於 cuDNN 要註冊 Nvidia Developer 才能下載,這邊直接用你的主系統下載即可,兩邊的 filesystem 是相通的,可以直接從主系統複製進 WSL:
mv /mnt/c/users/<username>/downloads/<cudnn-local-repo-ubuntu2204-8.9.5.30_1.0-1_amd64.deb> ./sudo dpkg -i <cudnn-local-repo-ubuntu2204-8.9.5.30_1.0-1_amd64.deb>請記得將 <username> 與 <cudnn-local-repo-ubuntu2204-8.9.5.30_1.0-1_amd64.deb> 修改成符合你情況的值,如果下載目錄不是預設的位置,也請修改路徑。並根據輸出的提示如下,執行指令:
Selecting previously unselected package cudnn-local-repo-ubuntu2204-8.9.5.30.(Reading database ... 39518 files and directories currently installed.)Preparing to unpack cudnn-local-repo-ubuntu2204-8.9.5.30_1.0-1_amd64.deb ...Unpacking cudnn-local-repo-ubuntu2204-8.9.5.30 (1.0-1) ...Setting up cudnn-local-repo-ubuntu2204-8.9.5.30 (1.0-1) ...
The public cudnn-local-repo-ubuntu2204-8.9.5.30 GPG key does not appear to be installed.To install the key, run this command:sudo cp /var/cudnn-local-repo-ubuntu2204-8.9.5.30/cudnn-local-FB167084-keyring.gpg /usr/share/keyrings/
如上範例,依照他的指示執行 sudo cp…。注意!請複製你的終端輸出的內容而不是我的。執行完後,再輸入以下指令:
sudo apt update -ysudo apt install libcudnn8 -y請注意,第二行指令安裝的是 libcudnn8,這是由於前面我下載的cuDNN是 8.9.5 版的緣故,若未來有其他版本更新,請根據所下載的版本修改指令。
接下來用 vim 打開你的 ~/.profile,將以下內容加到最後
export LD_LIBRARY_PATH=/usr/lib/wsl/lib:$LD_LIBRARY_PATH這邊強烈建議連同 /root/.profile 一起修改,然後退出 wsl 重新進入。
接下來再次輸入測試指令:
python3 -c "import tensorflow as tf; print(tf.config.list_physical_devices('GPU'))"這次就能成功看到你的 GPU 了!
[PhysicalDevice(name='/physical_device:GPU:0', device_type='GPU')]